
This page is to introduce Walk Leaders to the new Ramblers online Walks Manager system which will be used to create, publish and update any future group walks. Walks Manager allows each walk leader to add and edit their own walk details, which are then checked before publishing. We hope as many walk leaders as possible will be able to use Walks Manager for your next walk, so this is a good time to have a look and get to know the system. Don’t worry if you’re less confident with computers, as you can still just use the attached (updated) ‘walk details form’ if Walks Manager doesn’t work for you.
Some of our walk leaders have already successfully tried Walks Manager. The attached instructions are partly based on their feedback and aim to be as clear and straightforward as possible, so please have a go. With a little practice, it’s not difficult; nothing will appear online until the very end of step 3, after all the details are checked for each walk.
Step 1: Set up a Ramblers Account (if you don’t already have one)
If you don’t already have one, you’ll first need to set up a Ramblers Account via the national Ramblers website www.ramblers.org.uk using your usual email address and a password. Your Ramblers Account will give you access to more Ramblers information and allow you to enter information into Walks Manager. If you’re unsure about this or have any problems, Ramblers Central Office should be able to help you set up an account if you give your membership number and the relevant details on the phone. Their contact details are on this web page Contact us -Ramblers
|
HOW TO SET UP A RAMBLERS ACCOUNT OR UPDATE YOUR ACCOUNT DETAILS Visit the Ramblers website www.ramblers.org.uk to reach the Welcome page, then follow the steps below: |
|
|
If you already have a Ramblers Account and have logged in before: If you are using a mobile device, Click on the three ‘menu’ bars in the top right-hand corner. Top of the page then expands with four new headings. Below these four headings, a grey bar shows - Have an account? Sign in If you are using computer, in the centre a the top of the page, click on Sign in Click on Sign in and follow instructions to log in using your existing password, or set up a new password. If successful, you should reach a new Welcome page with your name and ‘Manage your account’. Under ‘Manage your account’ click on ‘My details’ to check or change your email address, password, phone number and other contact details. It will help with group administration if you also tick ‘Yes, keep me updated' tick 'by email’. If you’ve made any changes, please click ‘Save changes’ (yellow box) before closing the page. You can also access Walks Manager from the My Account page, under the section ‘Your Volunteering’ near the bottom of page. |
If you’ve never logged in before and don’t yet have a Ramblers Account: Scroll down the Welcome page to the heading ‘Create a My Ramblers Account’ and click on this heading. Then follow instructions to Sign Up, starting with ‘enter your email address’ and ‘continue’. This will check if there’s already an account associated with this email address. You’ll then be invited to create a password and log in to your Account. When you have an Account, you can then add the information requested (email address, password, phone number and other contact details). It will help with group administration if you also tick ‘keep me updated by email’. When your Account is set up, you should reach a new Welcome page with your name. From here you can manage all aspects of your Account and access Walks Manager, under the section ‘Your Volunteering’ near the bottom of page. |
Step 2: Confirm your contact details and permissions in Walks Manager
Walks Manager is accessed via https://walks-manager.ramblers.org.uk/walks-manager or from the My Account page, under the section ‘Your Volunteering’ near the bottom of page, click on 'Walks manager'
Your log-in details should be the same as used to access your Ramblers Account. When you’ve logged in, you should then see the heading Welcome to Walks Manager, followed by your name. The image below shows how this looks.
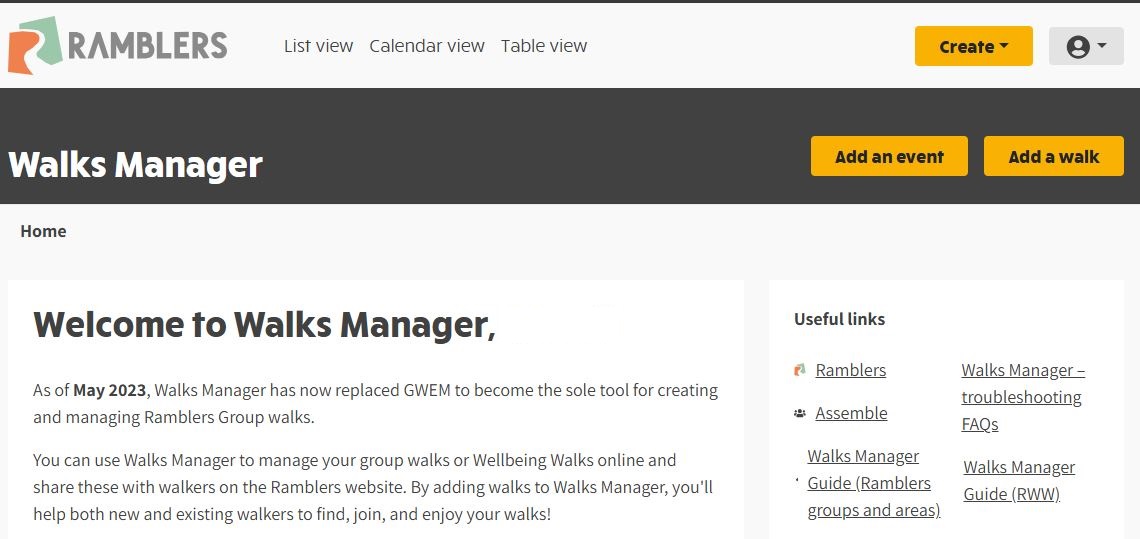
On the 'Welcome to Walks Manager' page, look for the small ‘head and shoulders’ portrait icon in the top right of the screen with a down arrow beside it. Click on the down arrow and select 'Contact Preferences' from the drop-down list.
This takes you to the page where you can check your contact information and give permission for your display name and contact number to be displayed with your published walks, by ticking the three yellow boxes. The image below shows how this looks.
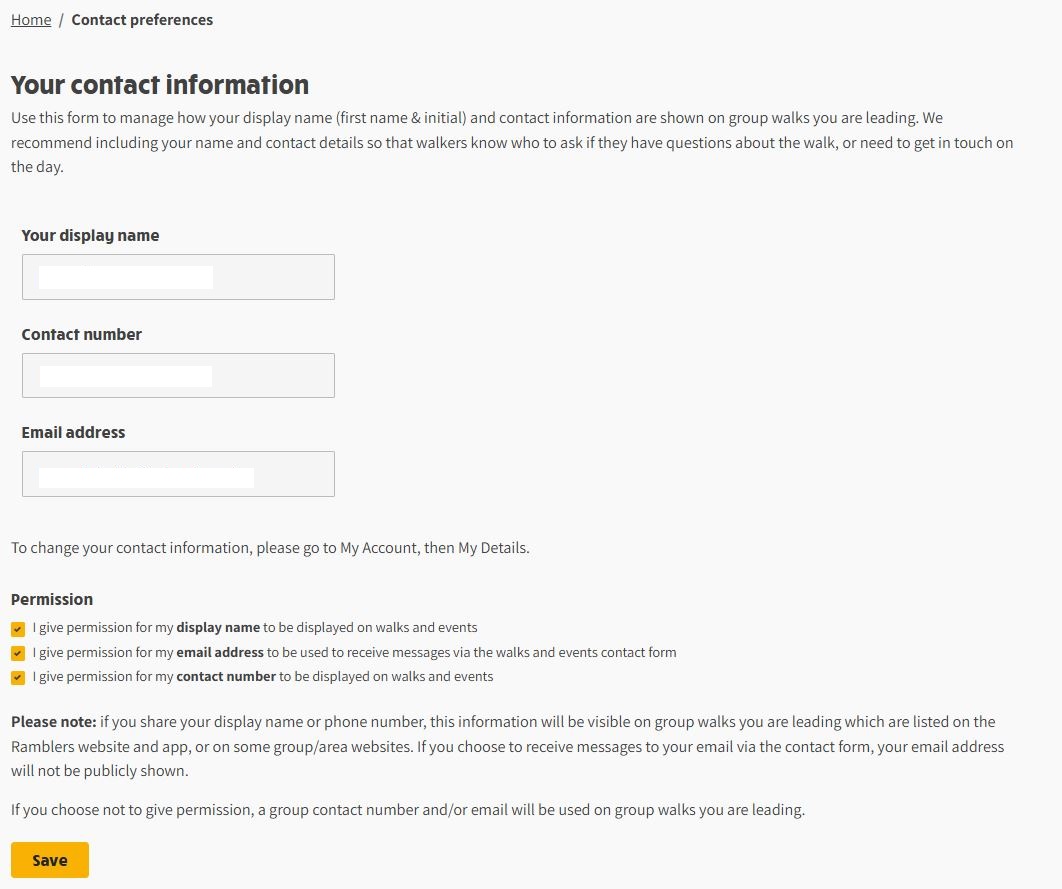
- If you give permission to receive email messages, your email address will not be published but any email enquiries about your walk will come to you via an online contact form included in your walk listing.
- If you do not give permission for your email address to be used, any email enquiries about your walk will go to our group email address and will be delayed reaching you, as someone else (usually the Walks Co-ordinator) will first need to find the enquiry and pass it on to you.
Updating contact details
If you have checked your display name, contact number and email address on Walks Manager and these are incorrect, please update the ‘My Details’ section of My Account within the Ramblers website (as described in Step 1). Once you have updated your details, it may take up to 24 hours for these to update within Walks Manager. It’s also important to remember that any changes you make to your email address will also affect your Ramblers login. Once updated please now use your new email address to login to all Ramblers systems.
Step 3: Enter or update walk information on Walks Manager
This is the fun bit when you actually have walk details to enter or update, for a known future date. The relevant boxes to complete are all accessed via the Welcome to Walks Manager web page https://walks-manager.ramblers.org.uk/walks-manager
It’s worth looking around in this section, ready for when you have any walk details to add. Nothing will appear externally if you’re just having a look around and trying out a few boxes.
More detailed guidance can be found in the Walks Manager Guide (Ramblers groups and areas) which is in the ‘useful links’ section on the Welcome to Walks Manager home page. Suggest opening this important document in a separate tab or window so you can refer as necessary without having to leave your 'active' pages.
3a) To add a new walk
On the Welcome to Walks Manager page, click on the yellow ‘add a walk’ box just below the portrait icon and follow through the steps 1-4 below asking for information about your walk. You’ll need to ‘save and continue’ each stage before moving on to the next.
1- Basic information (walk title, date / time, walk leader details)
2- Description (includes the option to add photos, perhaps taken during a recce)
3- Location (TIP - using the map pointer will automatically give the grid ref, postcode, What3Words address for the walk start point )
4- Walk grading (difficulty, distance, approx. finish time) Once you’re satisfied all the required information about your walk has been added, please ‘submit for checking’. We’ll come back to you with any queries or let you know when the walk has been published. You can also log in to Walks Manager to check the status of your submitted walks.
See also Instructions on how to Create a Walk on pages 8-13 in the Walks Manager Guide
3b) To edit a walk which is already listed or published
At the top of the Welcome to Walks Manager page, choose either list view, calendar view or table view to find the walk you wish to edit. To make this easier you can also choose the option to ‘just show the walks you’re leading’, once in your chosen view.
Then click on the walk you wish to edit to open the walk details.
Click the grey box labelled ‘Manage’ (above the walk title) then choose the option to Edit the walk.
If the walk is already published, you may also choose the option to Unpublish before changing any of the details. Then work through steps 1-4 as above, editing whichever parts of the information need updating.
- If the changes are minor, you can then publish changes.
- If the changes are more significant or you’ve unpublished the walk, you can then re-submit for checking as for a new walk.
See also Instructions on how to Edit a walk on page 24 in the Walks Manager Guide
(V6 revised 21/07/2024)